Have you ever set up your photo booth, looked at the test shots, and thought, “Why do these look so… flat and bland?”
Maybe you’re relying on the built-in RGB ring light that came with your booth, but your photos are turning out dark and grainy. Or maybe you bought an off-the-shelf lighting kit online, but now your guests have harsh shadows on their faces, or their skin tones look totally unnatural. If you’re struggling to get that flawless, premium look, you are in the exact right place.
In this complete guide, we are going back to basics. We’ll cover exactly how to master photo booth lighting so you can take your business to the next level. You’ll learn the best spots to place your camera and lights, the secrets behind soft shadows and color temperature, the pros and cons of flash versus continuous lighting, and even how your software (and AI!) plays a massive role in the final image.
Ready to make your photos look incredible and keep your clients coming back for more? Let’s dive in.
Prefer to watch instead of read? Check out my full presentation on mastering photo booth lighting below, or keep scrolling for the complete written guide!
The Foundation of Photography
If you want to build a highly successful photo booth business, we have to start with the single most important element of the craft. Before you worry about props, backdrops, or marketing strategies, you need to remember the definition of photography. Photography is, at its absolute core, no more and no less than the capture of light. Without light, we don’t have businesses! It’s the starting point for everything we do, so having a basic understanding of how it works is critical.
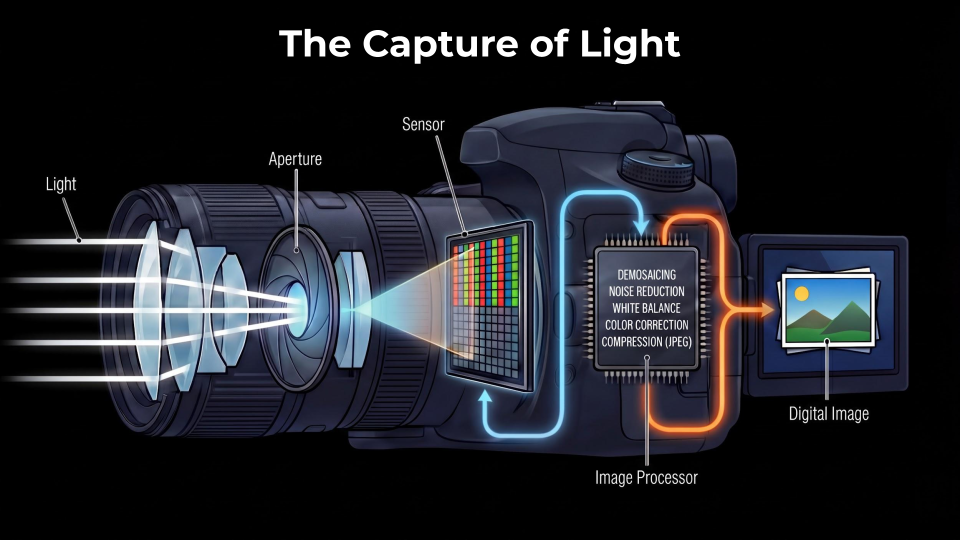
To truly appreciate this, let’s look at the anatomy of a photograph. Light travels from your environment, reflects off your subject, and enters through the camera lens. Inside that lens is a small opening called the aperture. The light passes through that hole and hits the camera’s sensor. This sensor converts the captured light into an electrical signal. That signal is then sent to an image processor on a tiny circuit board where a kind of technological magic happens—translating it into the beautiful digital image displayed on your screen.
But none of that magic happens without the right light entering the lens first.
Your Photo Booth is a Portable Studio
Think about it: every time you set up your photo booth at an event, you’re basically building an automated portrait photography system. You are taking a professional photo studio, making it portable, packing it up, and setting it up so that guests can take their own portraits.
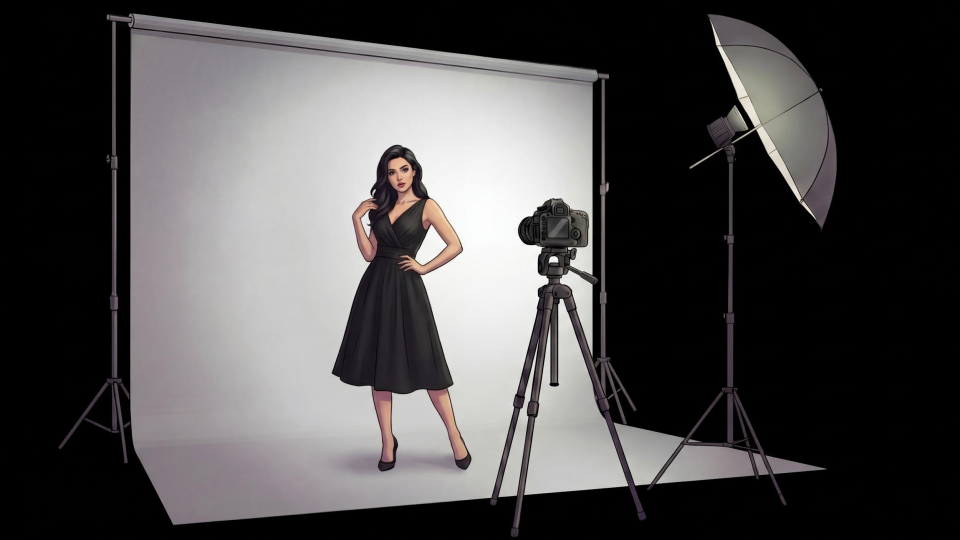
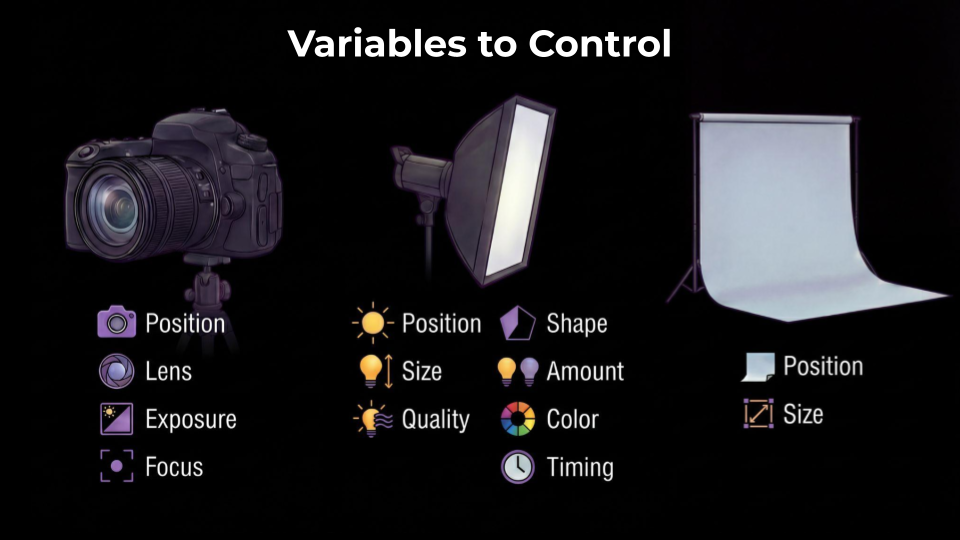
The beauty of this system is that it presents an incredible opportunity: you get to control almost all the variables. Sure, you can’t control the rowdy kids running around—those are your confounding variables—but you have total control over the environment. You control the camera’s position, the lens, the exposure, and the focus. Most importantly, you control the lighting. You get to dictate the light’s position, shape, size, brightness, quality, color, and timing.
By mastering these variables, you elevate your photo booth from a simple party novelty to a premium portrait experience.
Setting the Stage: The Camera-to-Light Relationship
Before we dive deep into where to put your lights, we need to establish the “eye” of your automated studio—the camera. Lighting means very little if your camera is not set up for success. Most importantly, your camera’s position serves as the anchor point; it dictates exactly where your lights need to go.
Camera Height and Positioning
Where do you actually put the camera? A common mistake beginners make is setting the camera too low, forcing guests to look awkwardly down. The golden rule is to place the lens at eye level or slightly above.
In the US, this sweet spot is generally between 5.5 and 6 feet off the ground. Now, this doesn’t have to be a rigid measurement. Obviously, event guests come in all different heights, from tall groomsmen to kids, and you can’t move the camera up and down for every single person. But setting your baseline at about five and a half to six feet ensures that the vast majority of adults are looking straight ahead or slightly up at the lens, ready to catch the light perfectly.
The “Flattery” Tilt
Setting the camera slightly above eye level unlocks a crucial photography trick: the flattery tilt. When your camera is at 6 feet, you can tilt the lens slightly down toward your subjects. We are talking about a very subtle 1 to 3-degree downward tilt—nothing crazy!
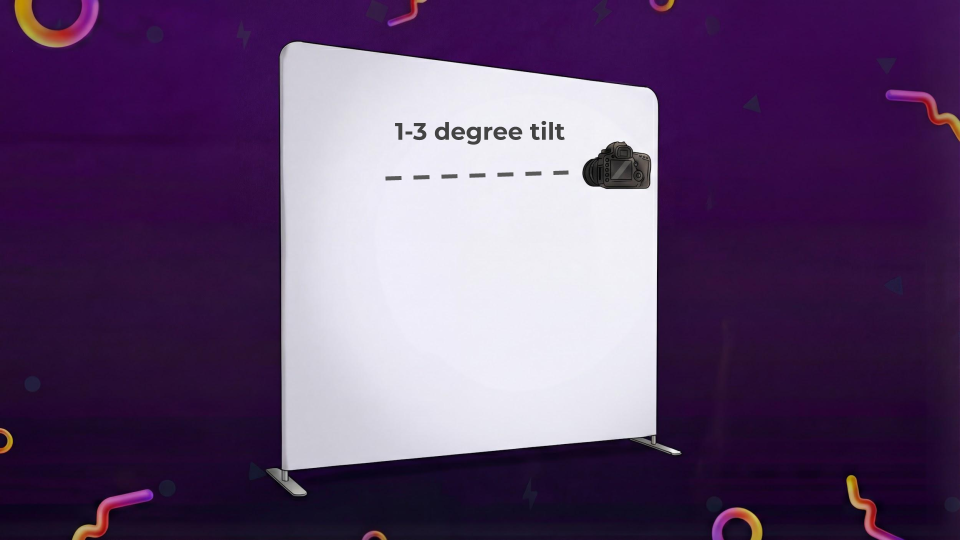
Why does this matter? Tilting the camera slightly down forces guests to angle their faces just a bit upward toward the lens and the light source. This naturally stretches the neck, illuminates the face evenly, and effectively hides the dreaded “double chin” that so many of us are self-conscious about in photos. It creates a much more pleasing, universally flattering look.
When guests look good, they feel good, and they share your photos way more often!
Light Positioning: Flattering Faces and Hiding Flaws
With your camera perfectly positioned, it’s time to introduce light. Where you place your light source in relation to the camera drastically changes the mood and flattery of the photo.
The Natural Angle: Lighting from Above
To understand the best place to put your light, we have to look at the “daddy of all light sources”—the sun. Human beings are completely adapted to the sun. We are so used to the sun being above us that our brains are naturally wired to view light coming from above as the most “normal” state of illumination.
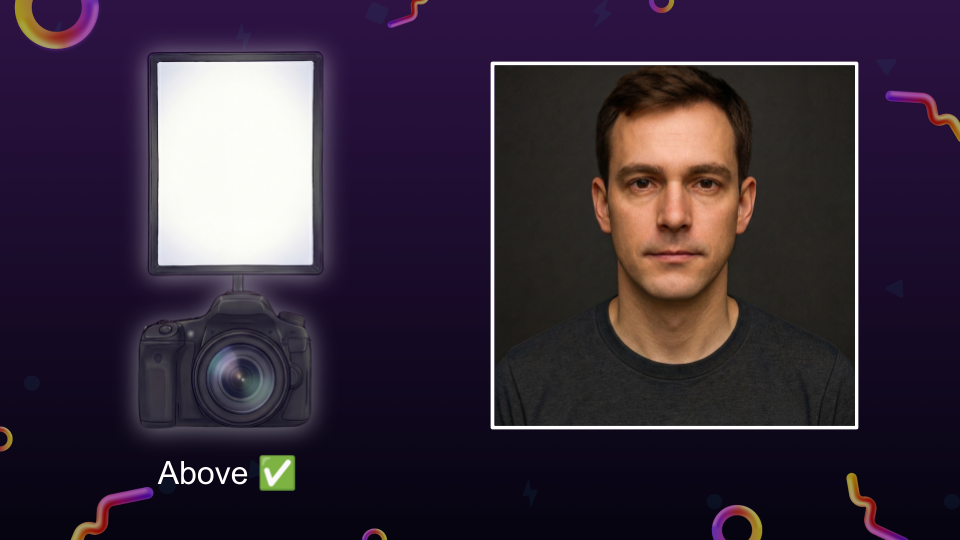
When you place your photo booth light above the camera, it mimics this natural environment. It casts shadows slightly downward, which creates pleasing depth under the cheekbones and jawline, naturally contouring the face.
Flawless Illumination: Lighting Around the Camera
Another highly recommended light position is around the camera—the classic ring light setup. When light surrounds the camera lens, it hits the subject from every possible forward angle at the exact same time.
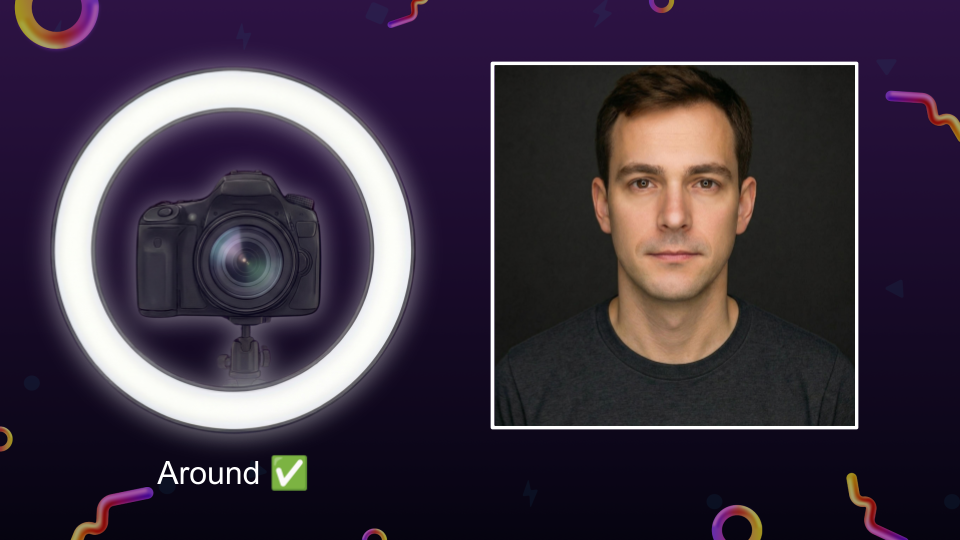
What this does is incredibly flattering: it points the shadows in all directions, effectively wiping them out. Our faces all have imperfections, and those imperfections are highlighted by tiny shadows. By using a light that surrounds the lens, you wash out those micro-shadows, creating a soft, flawless, airbrushed look that guests absolutely love.
The “Horror Movie” Mistake: Lighting from Below
If lighting from above is natural, lighting from below is deeply unnatural. Placing your primary light source below the camera lens creates what photographers call “monster lighting.”
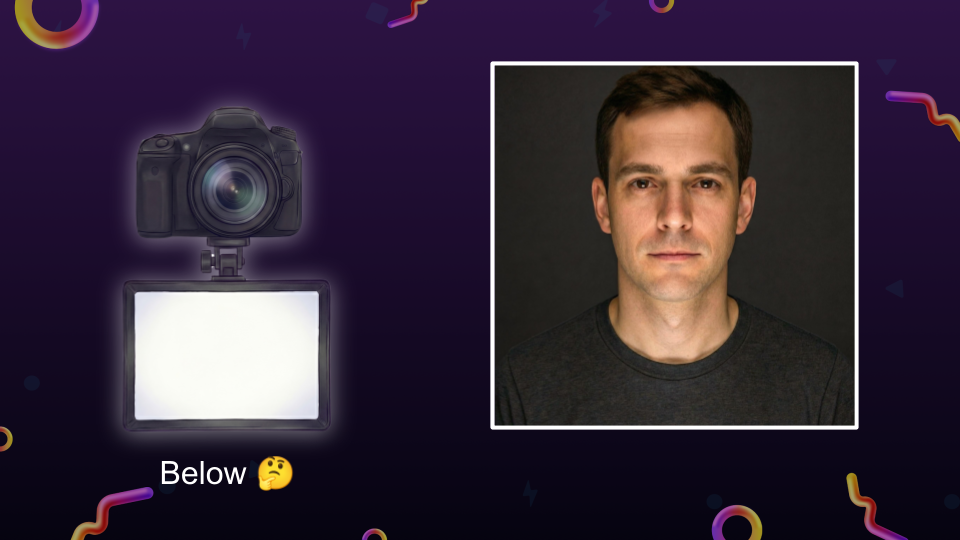
Think of holding a flashlight under your chin around a campfire. It casts shadows upward—above the nose and over the eyes. It distorts the face and makes people look kind of spooky!
Now, I’ll admit I’m not a total lighting snob. I’ve run a booth where the camera was mounted above a ring light (meaning the light was technically below the lens), and the guests still had a great time. But it’s definitely not ideal. To get the best results, keep your lights at or above the lens level.
Basic Studio Setups for Photo Booths
If you want to move beyond a single light source, you can build out standard studio lighting setups right in your photo booth footprint. You don’t need to go to art school to pull this off!

The Two-Light Setup: In this setup, your lights are placed roughly equal distances from the camera, off to the left and right. One of these is your Key Light. The key light is the main, brightest light source in the room (maybe set to 100% brightness). Because you can’t have light without shadows, the key light will cast shadows on one side of your subject’s face. To fix this, you use your second light as a Fill Light. Set to about 50% brightness, the fill light’s job is literally to “fill in” the dark shadows created by the key light, ensuring the face is beautifully lit without losing its natural depth.
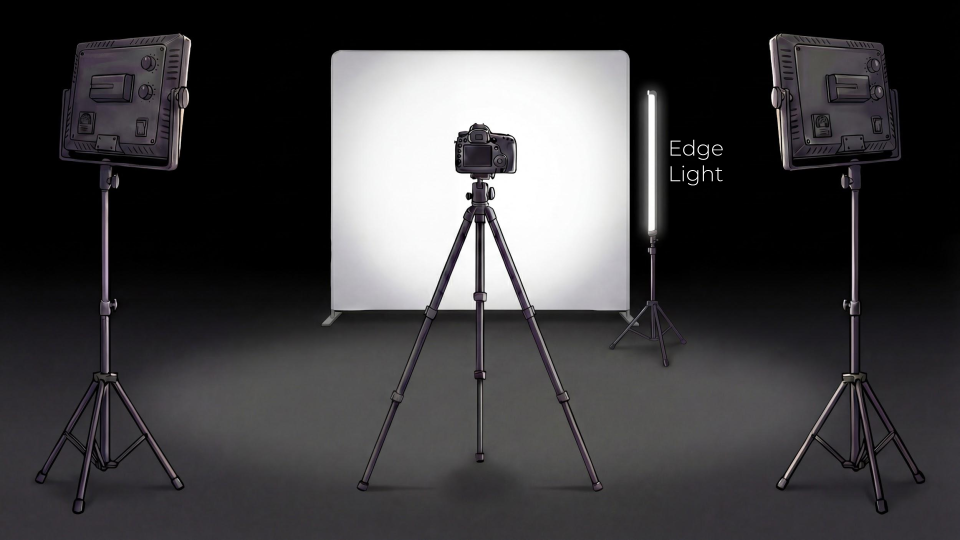
The Three-Light Setup: For a highly stylized, magazine-style look, you can add an Edge Light (sometimes called a backlight). This light goes behind or to the side of the subject, pointing back toward them.
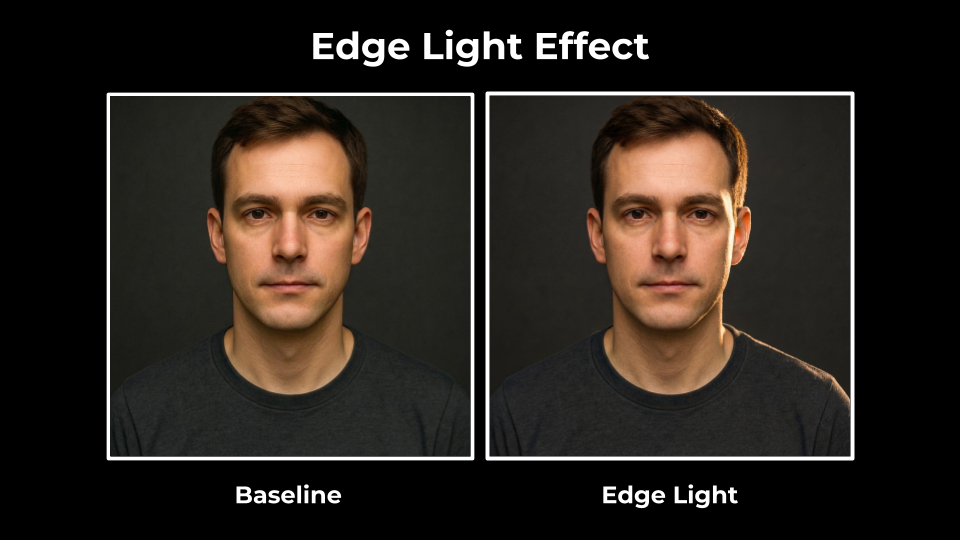
It illuminates the outline of the subject, creating a bright “edge” that separates them from the backdrop. It adds awesome contrast and results in a very cool, fashionable look.
Overcoming Photo Booth Lighting Challenges
Understanding the theory of light placement is great, but applying it to real-world photo booths comes with some specific industry challenges.
The Problem with Built-in RGB Lights
Walk into any photo booth expo, and you’ll see hundreds of booths featuring built-in RGB (Red, Green, Blue) LED rings. These look incredible from across the room. The sweeping colors and animations are fantastic for grabbing people’s attention.
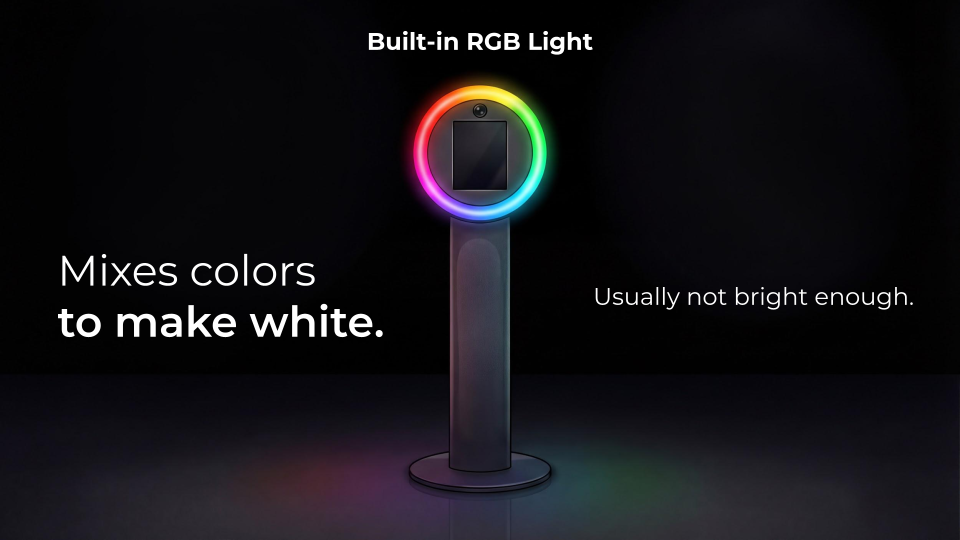
But as a primary photography light, they have a major flaw.
RGB lights create white light by mixing red, green, and blue LEDs together. It’s kind of the opposite of mixing paint. Unfortunately, this mixed white light is usually just not bright enough to properly expose a photo. Plus, because it’s “faked” white light, it doesn’t have the full color spectrum needed to make human skin tones look natural.
The Necessity of a Dedicated Key Light
Because standard RGB rings fall short, professional operators usually bring their own dedicated key light. You need a light source that is significantly brighter and higher quality than the RGB ring can provide.
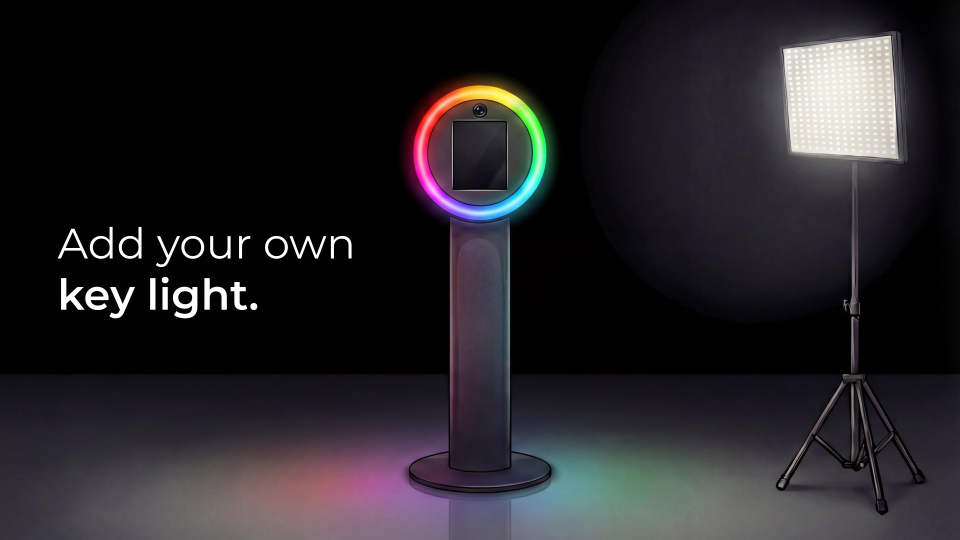
This doesn’t mean you have to set up bulky tripods off to the side, which can complicate traffic flow and create tripping hazards. Some modern booths allow you to attach a dedicated key light directly onto the main column.
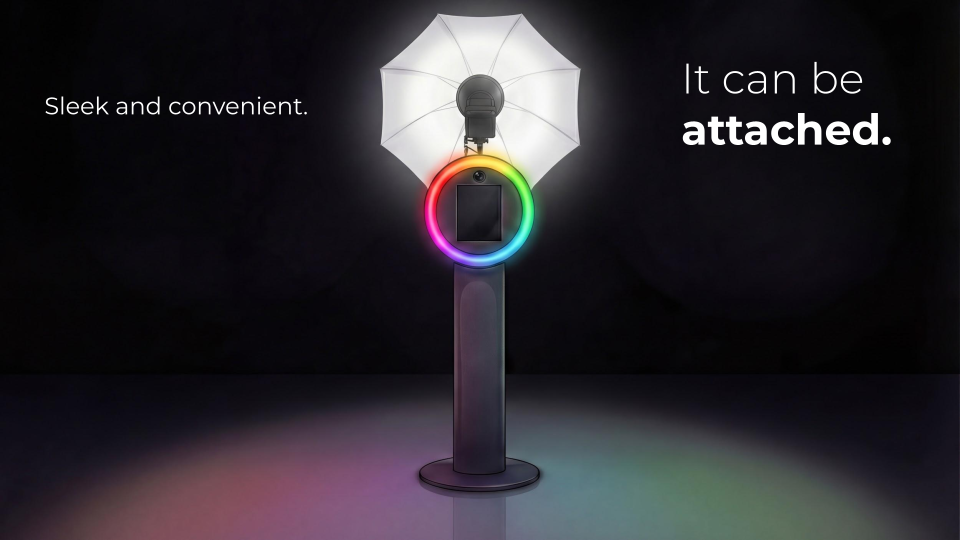
This keeps your setup sleek and convenient while still giving your camera the professional illumination it desperately needs.
Lighting for Large Groups
One of the biggest challenges at events is lighting a large group evenly. If you have ten people squeezing into a frame and only one light source in the center, the folks in the middle will be brightly lit, while the people on the far edges will fall into muddy shadows.
This is where the Two-Light Setup really shines.
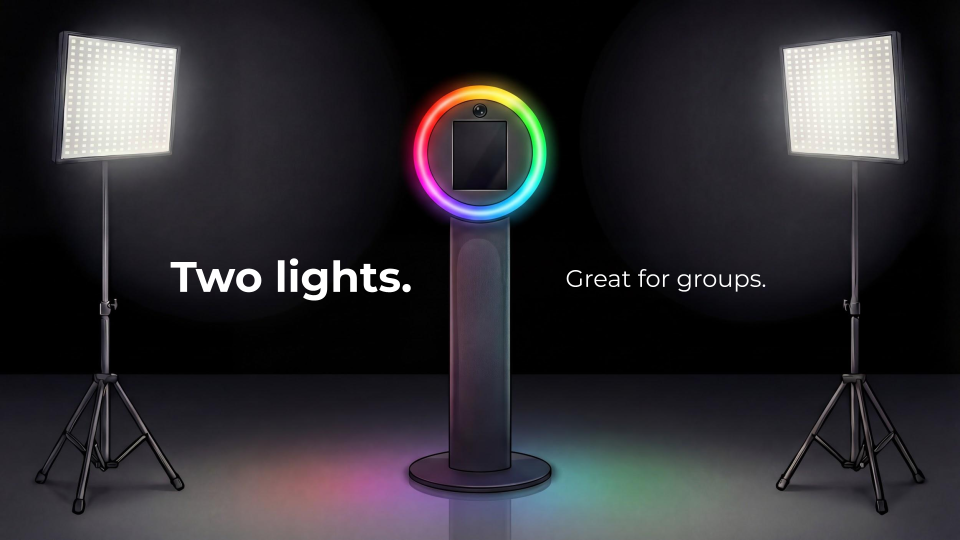
By placing two bright key lights on either side of the camera, you ensure that no matter which end of the group a guest is standing on, they have a light close to them. Two lights are always better than one for big groups!
The RGBWW Solution
Technology is advancing, and there is a great solution to the RGB problem: RGBWW lighting. (I know it’s a mouthful, but it just stands for Red, Green, Blue, Warm White, and Cool White).
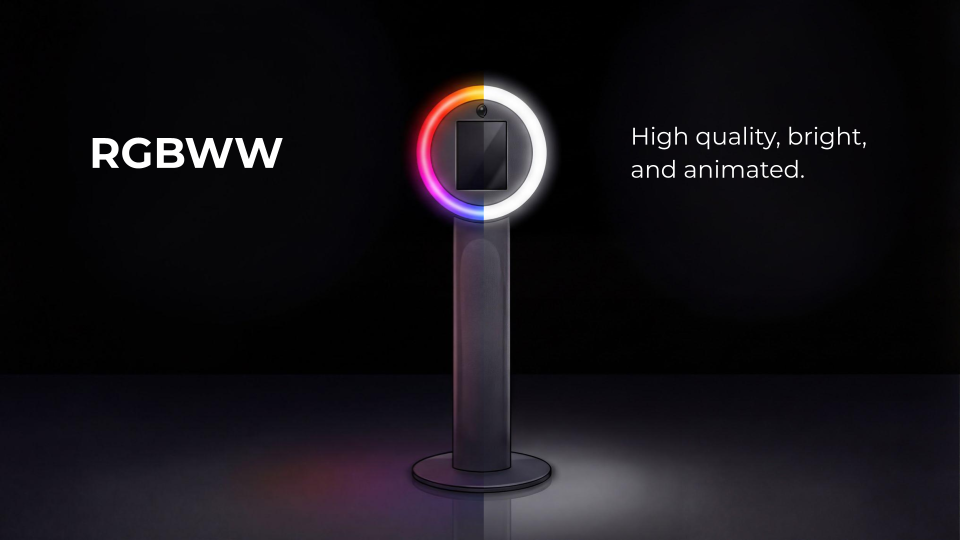
A light fixture with RGBWW technology includes dedicated, high-quality white LED diodes right alongside the colored ones. This means you don’t have to mix colors to fake a white light. You get the best of both worlds: high-quality, ultra-bright, accurate white light for the actual photo, while still getting to use those fun, animated colors to attract guests to the booth.
The Magic of Light: Size and Brightness
Let’s talk a little bit of science, but don’t worry, we’ll keep it simple! Understanding the physics of how light size and distance affect your photos is what separates the amateurs from the true professionals.
Size Equals Softness
Here is a golden rule of portrait photography: Bigger is better for soft shadows.
Remember that light and shadows are two sides of the same coin. A “hard” light creates shadows with sharp, defined, dark edges. A “soft” light creates shadows with smooth, gradual, feathered edges that blend beautifully into the skin. When lighting a face, you absolutely want soft shadows. Hard shadows emphasize every bump and pore, whereas soft shadows wrap around features flatteringly.
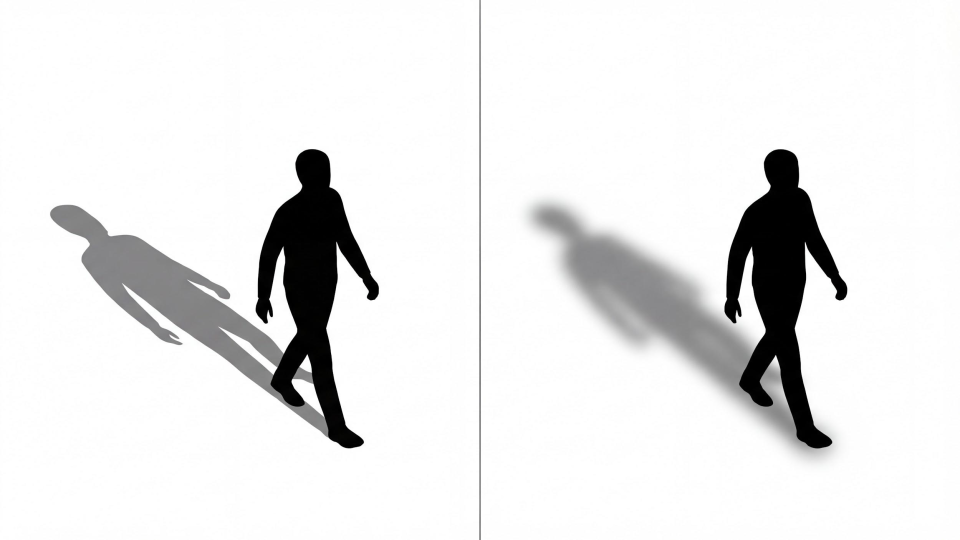
Let’s look at the sun again. The sun is massive, but because it is 93 million miles away, it appears as a tiny point in the sky. Therefore, it acts as a very small light source, casting incredibly harsh, hard shadows. This is why photographers hate shooting portraits in broad daylight at high noon!
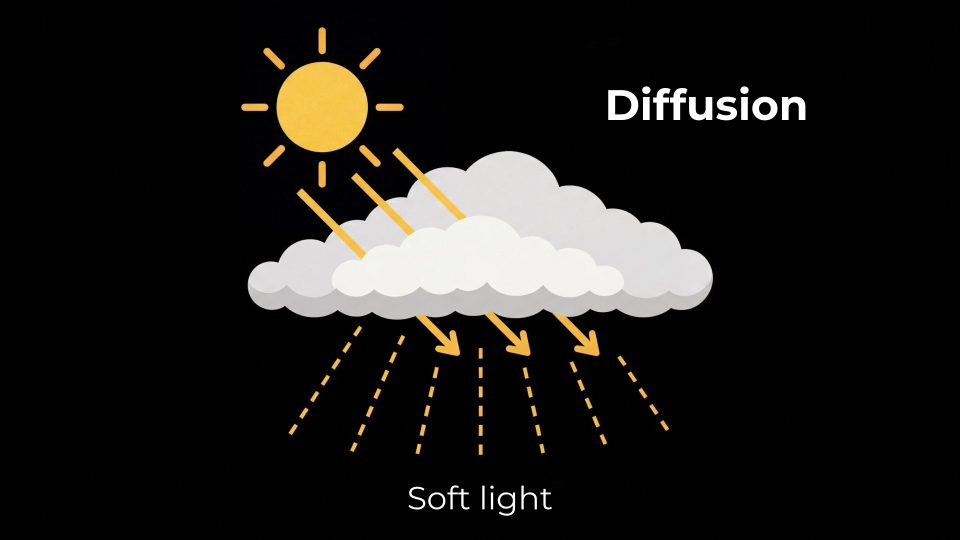
On the flip side, photographers love cloudy days. Why? Because the clouds act as a massive diffusion layer. The sun’s hard light hits the clouds, scatters in millions of different directions, and essentially turns the entire sky into one giant light source. The light becomes soft, even, and gorgeous.
Replicating the Clouds in Your Booth
You can recreate this cloudy day effect in your photo booth setup using diffusion.
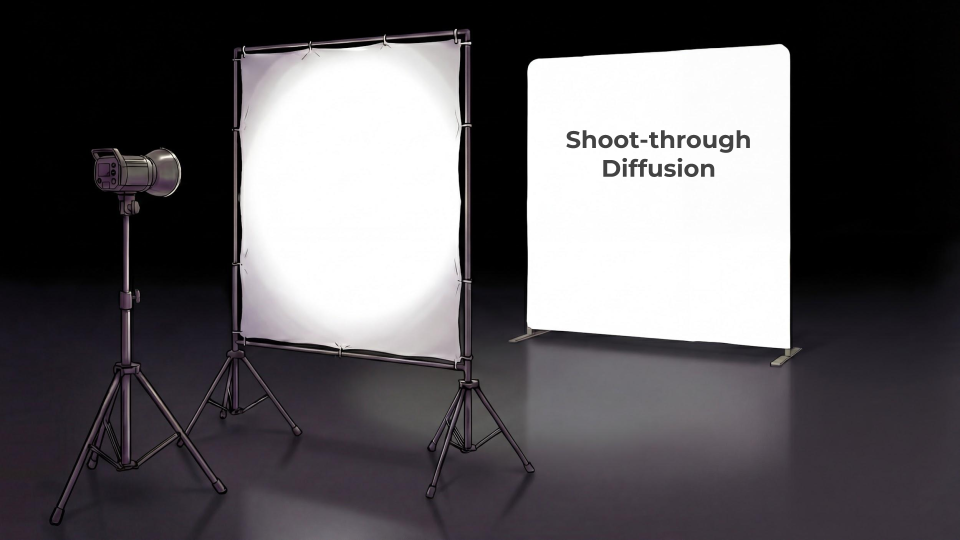
Shoot-Through Diffusion: By placing a semi-transparent white fabric (like a softbox or a scrim) between your light and your subject, the light hits the fabric and spreads out. The small, harsh LED bulb is no longer the light source; the large piece of fabric becomes the light source, giving you beautiful, soft light
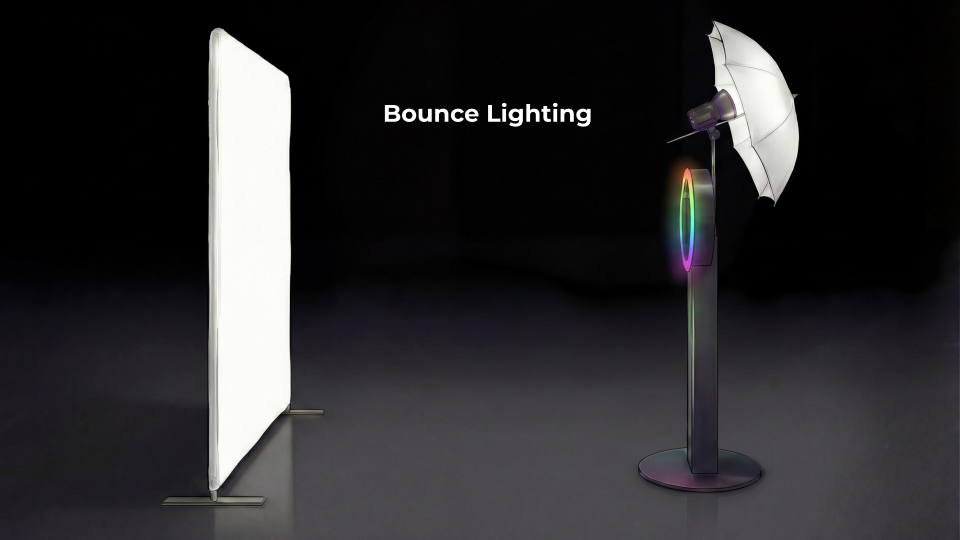
Bounce Lighting: Instead of pointing your light directly at the subject, you point it backward into a reflective white or silver umbrella. The light bounces off the large inside surface of the umbrella and back onto your subject, achieving that same massive, soft light effect.
Brightness and the Inverse Square Law
A simple rule of thumb for photo booths is that brighter is better. Intuition tells us that more light entering the lens helps the sensor do a better job capturing colors. But practically, bright light gives you vital flexibility with your camera’s exposure settings. If you don’t have enough light, your camera has to compensate, which usually leads to grainy or blurry photos.
But what do you do if your light is at 100% power, the venue is super dark, and your photos still aren’t bright enough? The ultimate lighting hack is simply to get closer.
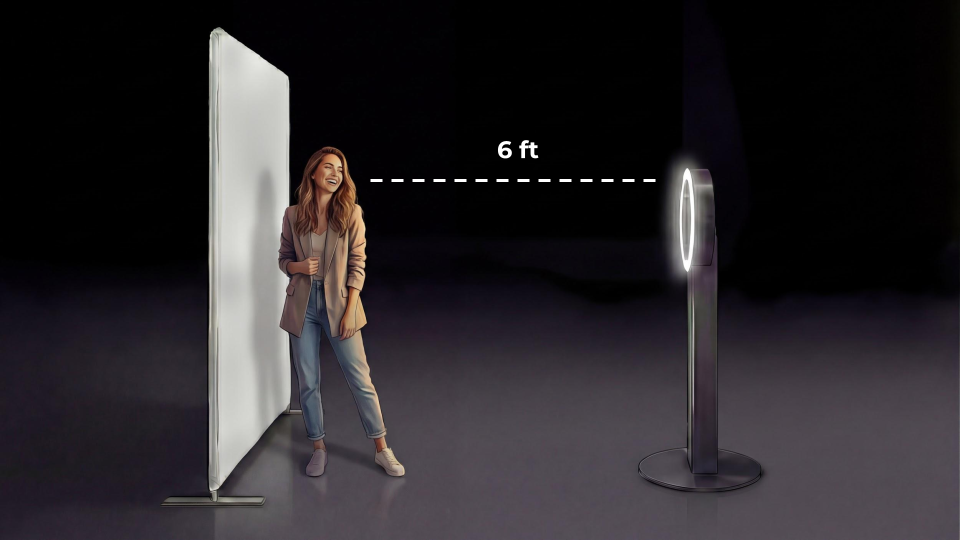
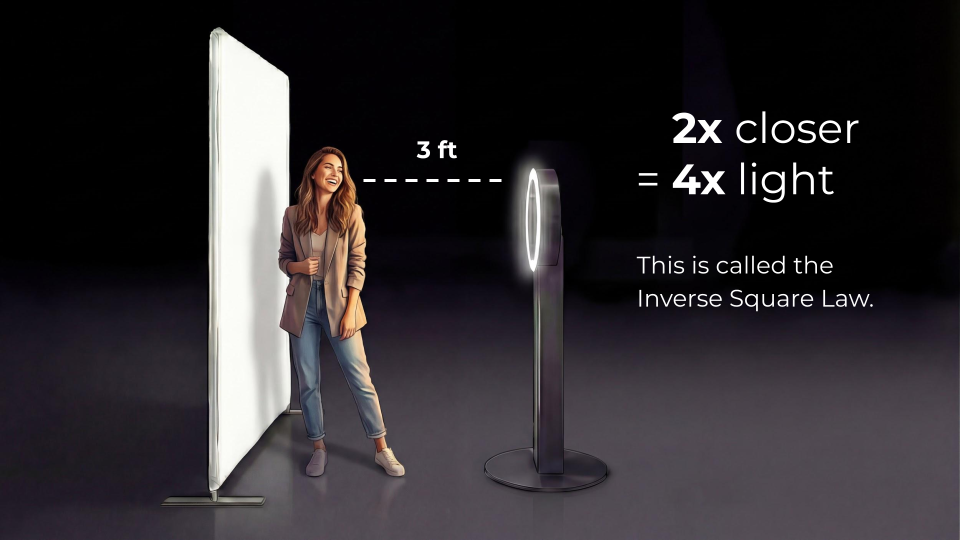
This is thanks to something called the Inverse Square Law. You don’t need a physics degree to understand it—I just like saying it to sound smart! Basically, if your photo booth is 6 feet away from your subject and the image is too dark, moving the booth halfway closer (to 3 feet away) does not just double the amount of light hitting the subject. It quadruples it! Getting 2x closer equals 4x the light.
Light Quality and Color Temperature
Not all lights are created equal. You can have the biggest, brightest light in the world, but if the quality and color are wrong, your photos will look amateur.
The Color Rendering Index (CRI)
The sun sets the absolute standard for light quality. We measure light quality using the Color Rendering Index (CRI), which is a scale from 0 to 100. The sun is a perfect 100.
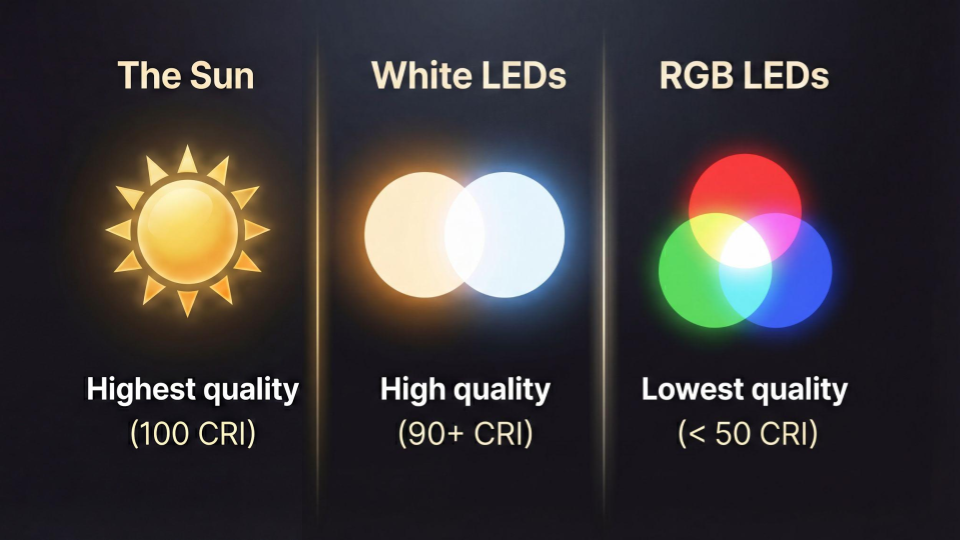
High-quality white LEDs built specifically for photography typically boast a CRI of 90 or above. Standard RGB LEDs (the kind that mix colors) often score an abysmal D-minus, falling below 50 CRI.
To picture this, imagine a graph of the color spectrum. With a cheap RGB light, the spectrum is “spiky.” It shoots out narrow bands of red, green, and blue, but leaves massive gaps in the yellows and oranges. Human skin tones are incredibly delicate. A low CRI light makes skin look gray, jaundiced, or just lifeless because it literally can’t output the right colors to illuminate the face.
A high-quality white LED creates a broad, smooth curve across the entire color spectrum. For a professional photo booth, you should always aim for lighting that offers 80+ CRI.
Matching Ambient Color Temperature
Light isn’t just measured by quality; it is measured by color, known as Color Temperature, using the Kelvin (K) scale.
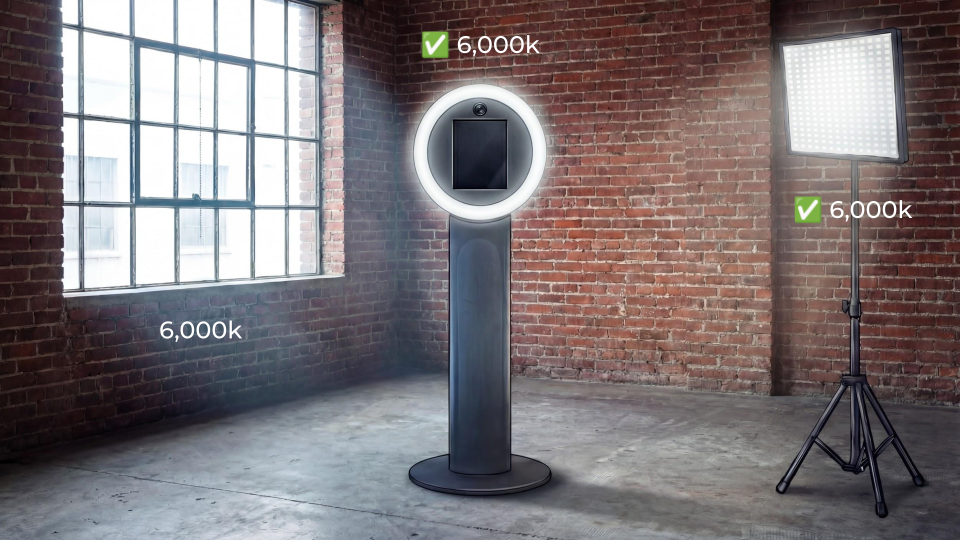
If you are setting up your booth in a room with a massive window letting in midday sun, that daylight has a color temperature of roughly 6,000K (a cool, slightly blue-white). If your photo booth light has an adjustable color temperature, you want to tune it to match that 6,000K ambient light.
What happens if you don’t match them? Have you ever been to a friend’s house where they just bought whatever bulbs were on sale at the hardware store? One lamp has a harsh, bright white fluorescent bulb from 1998, and the other has a super warm, orange “soft white” bulb. It drives photographers crazy!
In a photo booth, mixed lighting creates a massive problem for your camera’s white balance. The camera tries to identify what object in the frame is supposed to be true white or gray, and bases every other color off that.
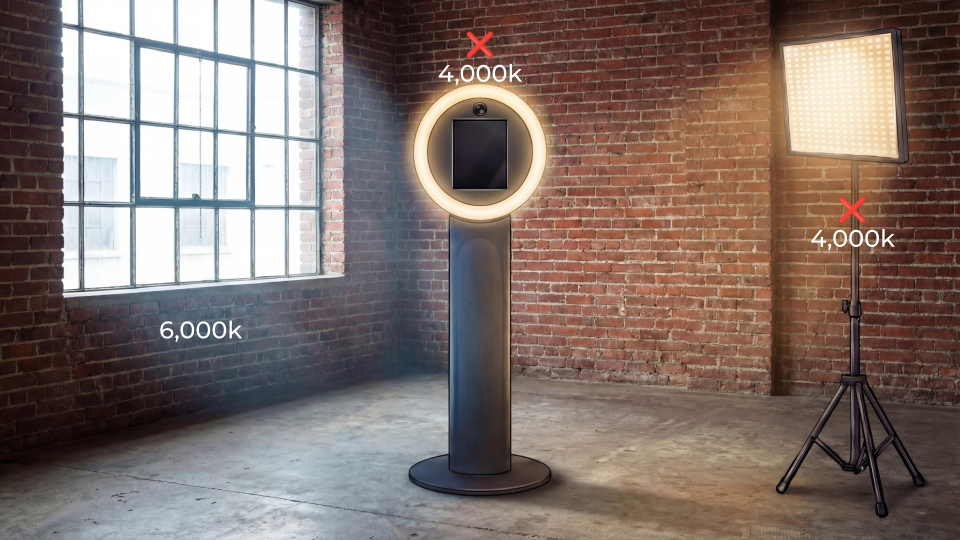
If your subject is being hit by 6,000K window light on one side and 4,000K booth light on the other, the camera has to guess. It will pick one side to be “correct,” meaning the other side will instantly suffer from an ugly “color cast”—looking unnaturally orange or aggressively blue.
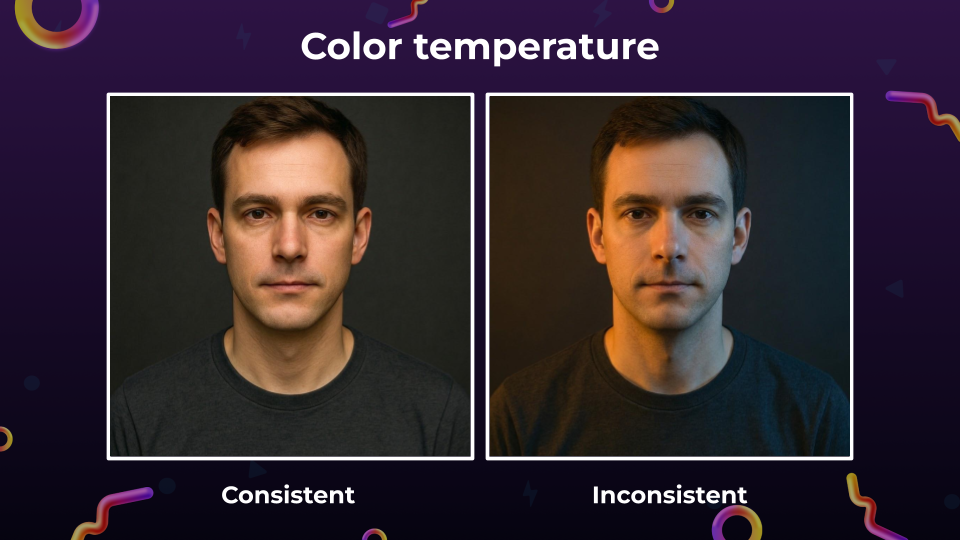
Keep your color temperatures consistent!
Timing: Flash vs. Continuous Lighting
Because LED technology has gotten so good in recent years, photo booth owners face a fun choice regarding the “timing” of their light: Do you use a traditional flash (strobe) that pops for a fraction of a second, or continuous lighting (LED panels) that stays on all the time? Both are great for photos!
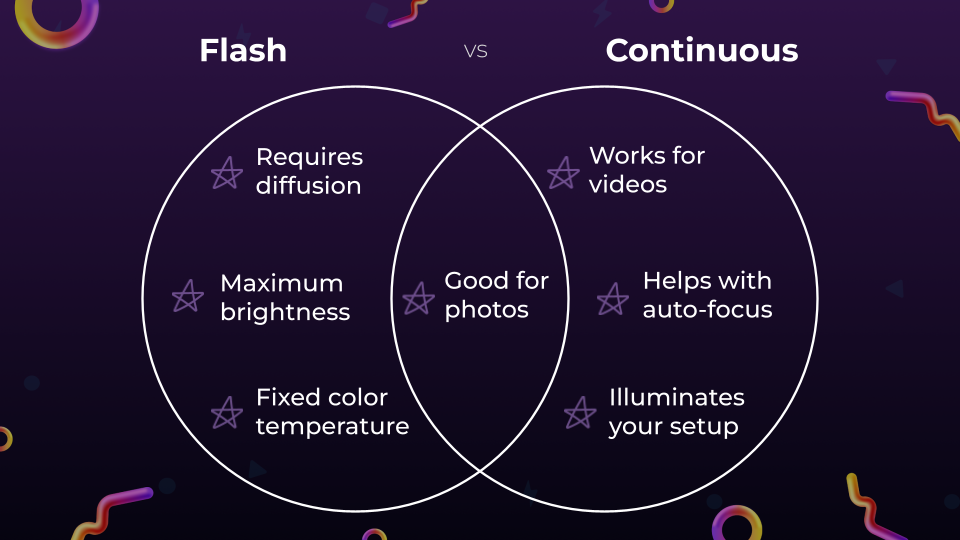
The Case for Flash
Flash photography has been the gold standard for a long time.
- Maximum Brightness: A flash can output a blinding amount of light in a fraction of a second. If you are hired for an outdoor event in the middle of the day, you have to compete with the sun. The only way to overpower the sun is with the massive burst of brightness that only a flash can provide.
- The Trade-Offs: Because flash bulbs are very small, they absolutely require diffusion (like an umbrella) to avoid harsh shadows. Plus, most standard flashes have a fixed color temperature, so it has to be your key light, and you just have to hope it doesn’t clash with the venue’s lighting.
The Case for Continuous Lighting
Continuous LED lighting is rapidly becoming the preferred choice for modern photo booths.
- Versatility for Video: If your booth offers Boomerangs, GIFs, or video features, you can’t use a flash. Continuous lighting is a must!
- Auto-Focus Assistance: Modern cameras have amazing auto-focus, but they still struggle in pitch-black reception halls. Having a bright continuous light ensures your camera locks onto faces instantly.
- Marketing and Attraction: You go through the effort of setting up a beautiful backdrop and sleek equipment. You want it to look good! Continuous lighting acts as a beacon. When guests walk in, they see a brightly lit, inviting studio setup from across the room and think, “I am definitely bringing my friends over to that photo booth later.”
My advice? Mix and match! You can use continuous LED rings for your attract mode and videos, while relying on a flash to provide the ultimate freezing power for photos.
Advanced Tactics: AI and Software Post-Processing
As we look toward the future of the industry, the hardware is only half the battle. Artificial Intelligence and advanced software post-processing are totally changing the game for image quality.
Lighting Knowledge Improves AI Prompts
Even as AI image generation becomes mainstream, your foundational knowledge of lighting is actually your superpower.
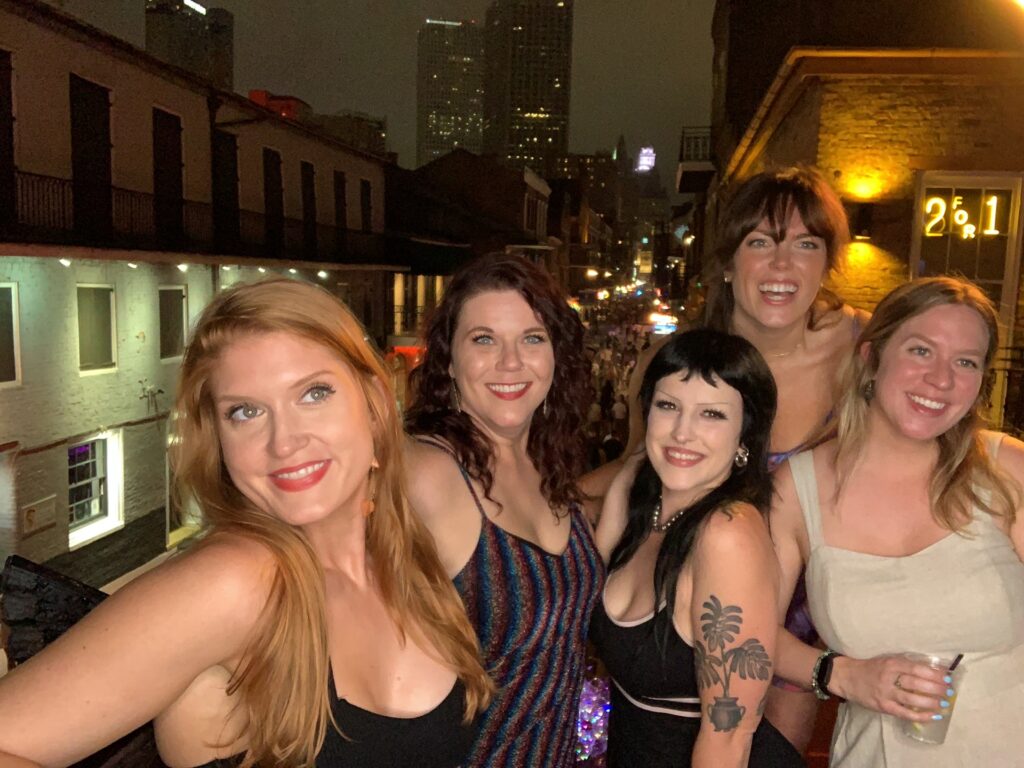
I recently tested an AI prompt on a photo of a group we shot on a dark balcony in New Orleans using only a ring light. If you just type, “Turn this into a band album cover,” the AI gives you a flatly lit image with some instruments thrown in.
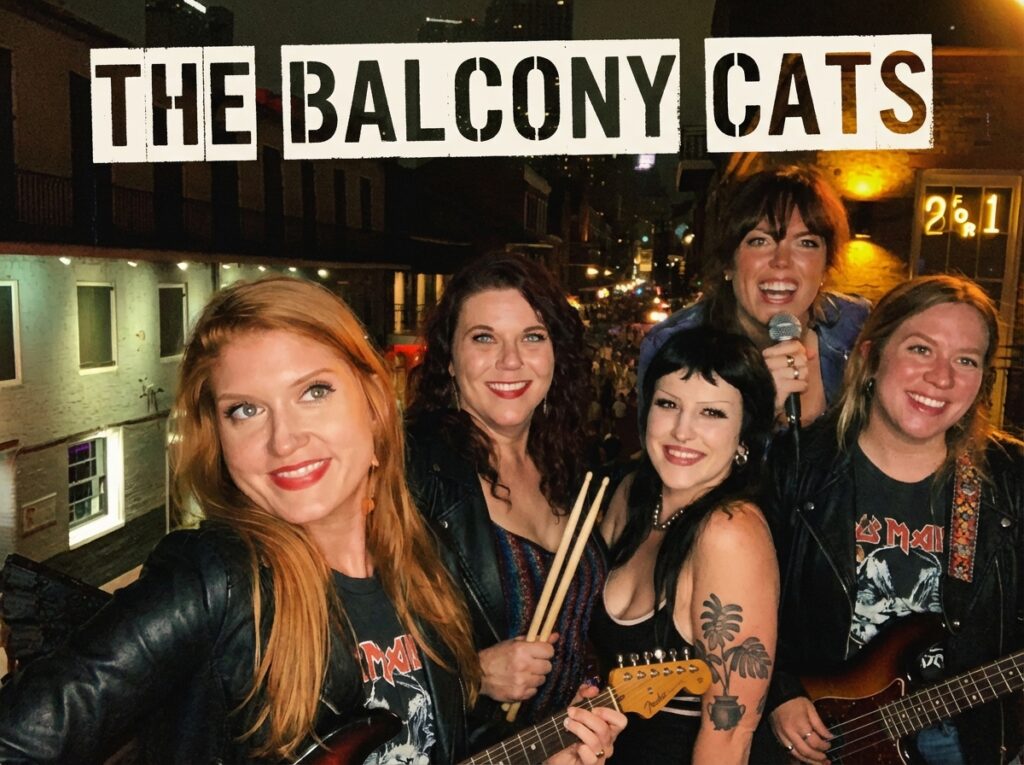
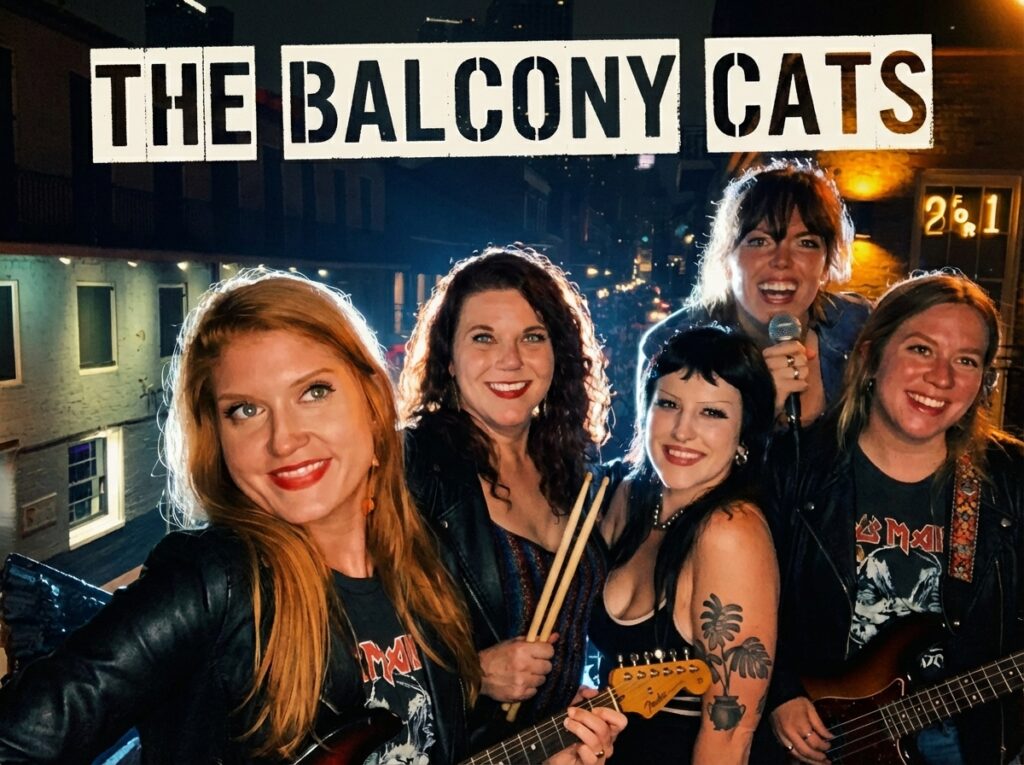
But because I understand lighting, I got much more descriptive. I prompted the AI: “Add dramatic studio lighting effect with edge/backlight. Relight their faces for smooth shadows and no shine. Make sure all faces are well-illuminated. Fix color casts for consistent white balance, and add a hint of atmospheric fog in the background.”
Because I used terminology like edge light, smooth shadows, and color casts, the AI understood exactly how to rebuild the image. It stripped away the ugly green ambient light from the streetlamps and produced an absolute masterpiece. Lighting knowledge is definitely not irrelevant!
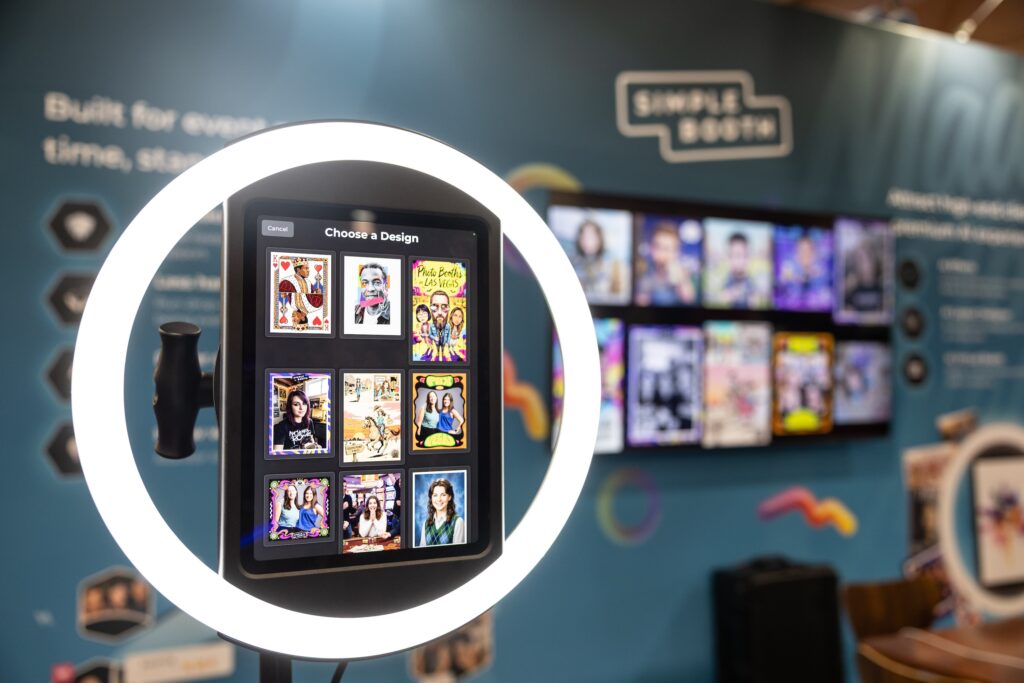
How Simple Booth Software Elevates Every Shot
Even without AI, the software running your booth heavily dictates your final image quality. You can have the best lighting in the world, but if your app compresses or ruins the photo during processing, it’s game over. This is exactly why we engineered Simple Booth software to obsess over image processing.
There are five major ways our software works behind the scenes to make your images pop:
- Color Spaces: Different cameras encode color data differently. Simple Booth is designed to handle these complex formats perfectly so your digital shares and prints look rich and true-to-life, never weirdly washed out.
- Dimensions and Resizing: It really matters when a photo gets resized during processing. Simple Booth applies effects to the highest-resolution file before compressing it for text or email delivery, meaning you never lose that crisp, high-quality detail.
- Background Blur: Our software features a highly advanced digital portrait-mode blur (bokeh). It maps the subject and beautifully blurs the background, mimicking the depth of field of a highly expensive DSLR lens—even if you’re just using an iPad!
- Skin-Smoothing (Glam Filters): It is not just about whether your software has a glam filter; it’s about whether it actually looks good. Simple Booth’s glam filter intelligently smooths skin tones while keeping essential details—like noses, eyes, and eyebrows—tack sharp. No “plastic mannequin” faces here!
- Color Filters: We use proper color grading and professional LUTs (Look-Up Tables) to take a flat digital image and give it the rich, vibrant, high-end look of professional film.
When you stack all of these Simple Booth software features together, you can perform absolute miracles. With our elite software processing, you can take a tiny photo shot from the ultra-wide lens of an iPad, apply our glam, blur, and color grading, and make it look incredibly close to a high-end DSLR shot! Our software does the heavy lifting so you look like a photography genius.
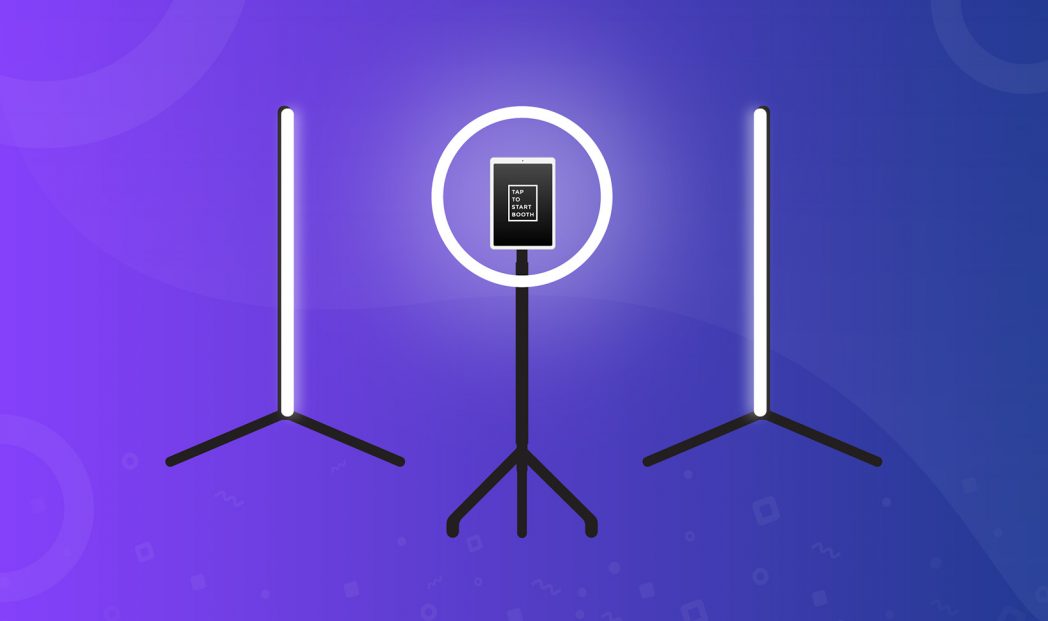
The Ultimate Solution: Upgrade to Simple Booth HALO
Understanding the physics of lighting, color temperatures, and software processing is amazing—but what if you could implement all of these best practices automatically, with a single, sleek piece of hardware?
If you are tired of fighting with cheap, dim RGB lights, struggling with exposure in dark venues, and spending hours trying to color-correct muddy images, it is time for an upgrade. Meet the Simple Booth HALO.
HALO is the engineered to be the best ring light for photo booths. It uses premium, high-CRI continuous LED lighting positioned perfectly around the camera lens, guaranteeing the softest, most flattering, shadow-free illumination for your guests. Unlike cheap RGB rings that mix colors to fake a dim white, HALO provides brilliant, color-accurate illumination that makes skin tones pop naturally.
Best of all, the hardware integrates flawlessly with Simple Booth’s industry-leading software. You get instant access to advanced post-processing features like intelligent skin-smoothing, digital background blur, and professional color filters right out of the box. The HALO isn’t just a ring light; it is a complete, automated portrait studio designed to squeeze the absolute maximum quality out of every single shot.
Stop settling for “good enough” lighting. Make your life easier, delight your clients, and command premium pricing by checking out the Simple Booth HALO today.
Conclusion
At the end of the day, photography will always be about the capture of light.
As a photo booth operator, you have the unique privilege of completely controlling the environment in which that light is captured. By taking control of your variables—from lens height and diffusion to color temperature and software processing—you step out of the realm of amateur snapshots and into the world of professional event portraiture.
Invest in your lighting, trust the basics, and watch the quality of your business soar!
Forget the hassle and invest in an all-in-one photo booth solution that’s built to last.